I just had de same issue with my V283 from 2007. Error message EU1 and light going on and off.
Changed two caps and it works perfect again. The caps are the 330MF 35V. (total cost 1.5 Euro)
I just had de same issue with my V283 from 2007. Error message EU1 and light going on and off.
Changed two caps and it works perfect again. The caps are the 330MF 35V. (total cost 1.5 Euro)
Ha! Pretty funny this thread pops up from time to time. Almost 10yrs ago and still running great for me!
What do the caps look like? Can you please post a photo?
Thanks, Kirk
Hi Kirk, I do have a picture but I have no idea how to add it to the post.
The caps are black with a grey vertical strip; 2 identical caps from 330MF and 35 V. You’ll see a red led diode, it’s the 2 caps next to the diode.
Rgds, Phil
Got a V283 2007 classic off of FB Marketplace and had the U1E / 203 error pop up two hours after plugging it in!
Will try pulling the board and checking and replacing the caps as Phil & J. Durham have done.
Will try to document and post photos if able and hopefully get the good results they did!
OK. Here is my step by step journey with hopefully with photos! I go step by step in posts, then re-post as a new thread.
STEP 1
Backstory is I bought a V283 2007 classic off of FB Marketplace and had the U1E / 203 error pop up two hours after plugging it in!
Moved it myself carefully and waited 48 hours to plug in for the compressor fluids to settle.
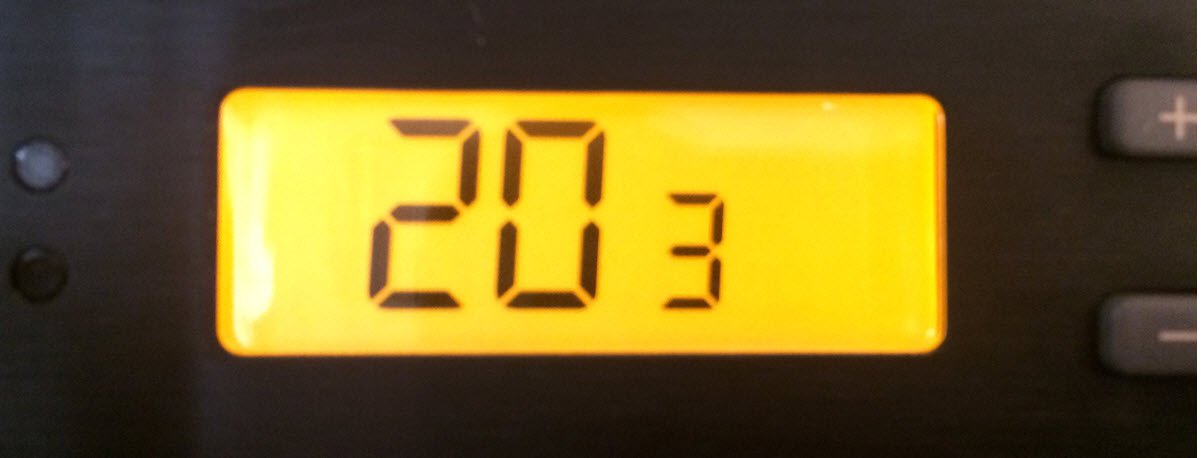
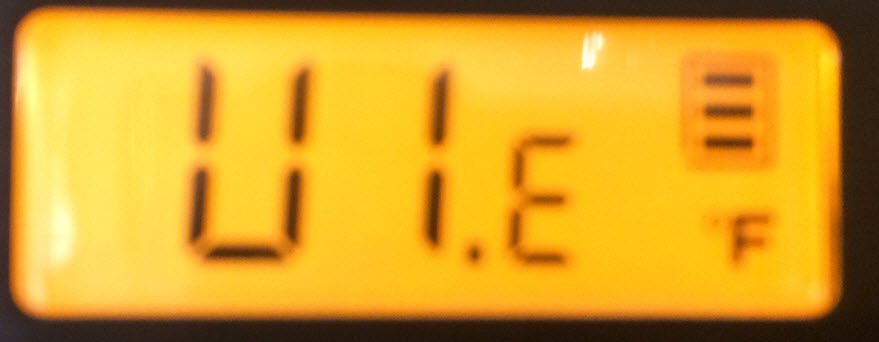
Set the unit up per manual and set temp to 54 degrees. After about two hours starting from a temp of 76 deg F the unit got to 56 deg F and the U1E and 203 errors started flashing as shown here.
Side note - This site requires 25 posts to be able to post pics in your posts. I asked the site admins to allow me to add pics early and they graciously agreed! Use the preview mode and at the bottom you can use the attachment tab to add your files.
Using the helpful posts from Phil and Kirk above, I went after replacing the bad capacitors they had success with.
STEP 2
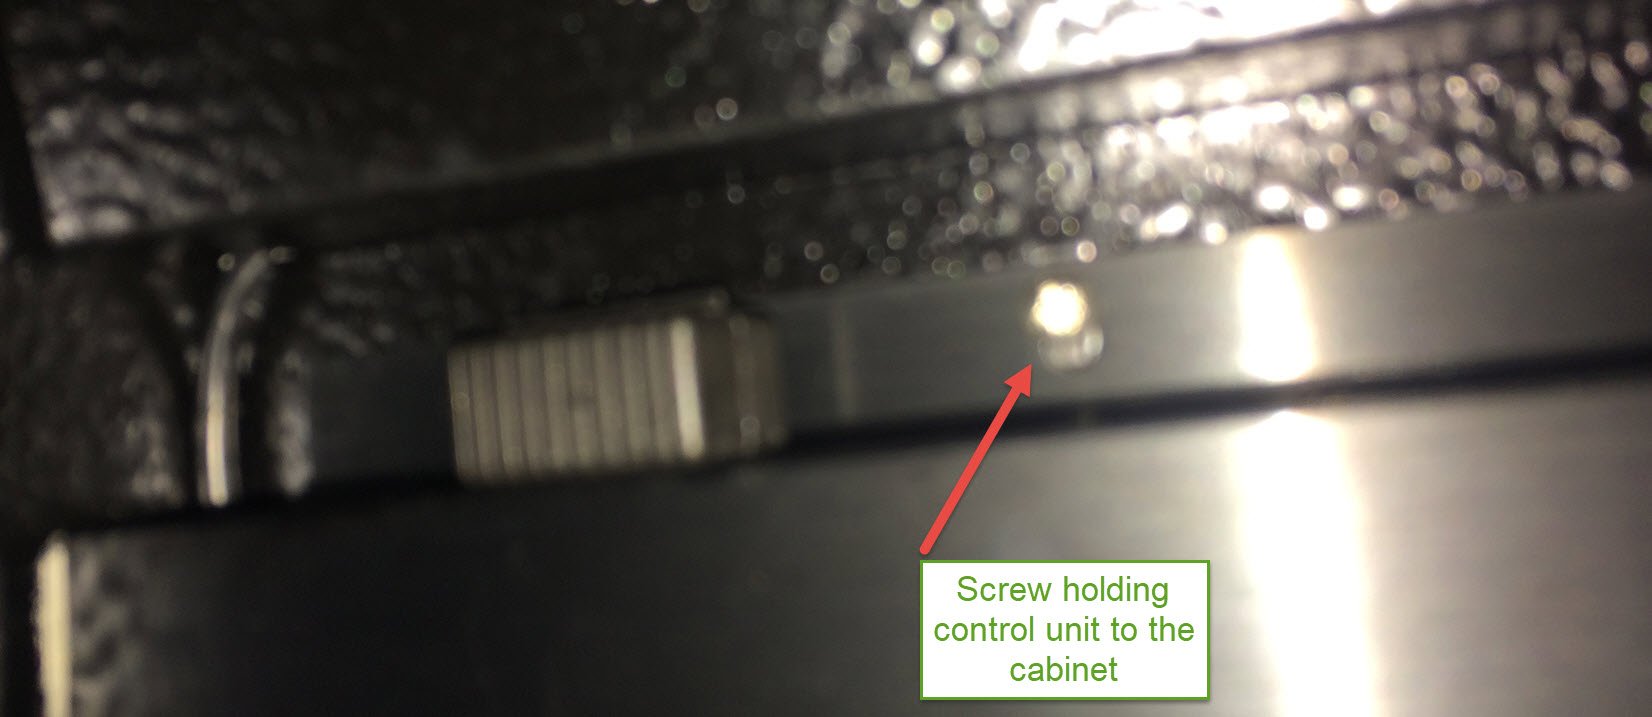
After unplugging the unit, I opened the front door and located the two screws on the inside upper lip of the unit that holds the control panel in place to the unit. These are the two worst pics of the bunch and I apologize for the poor quality. They are two regular Phillips screws. Each is located about 3 inches from the front left and right corners of the unit. (Pics 1 & 2)
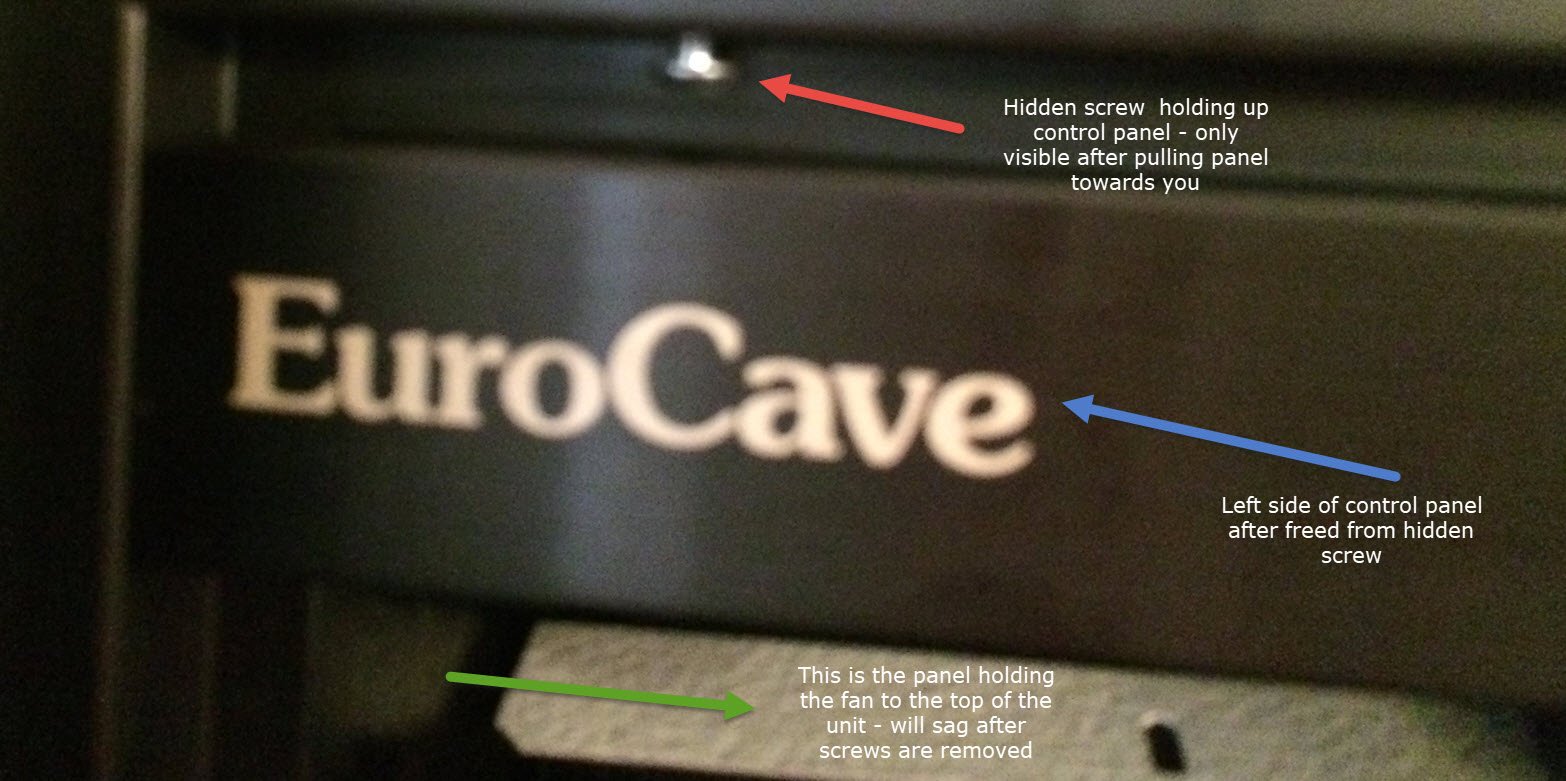
Simply remove the screws and don’t lose them. Be aware that the control unit also holds up the metal sheet that holds the fan to the inside top wall of the unit. This sheet will sag when the screws are removed, but the fan did not fall out. (Bottom part of the 4th pic.)
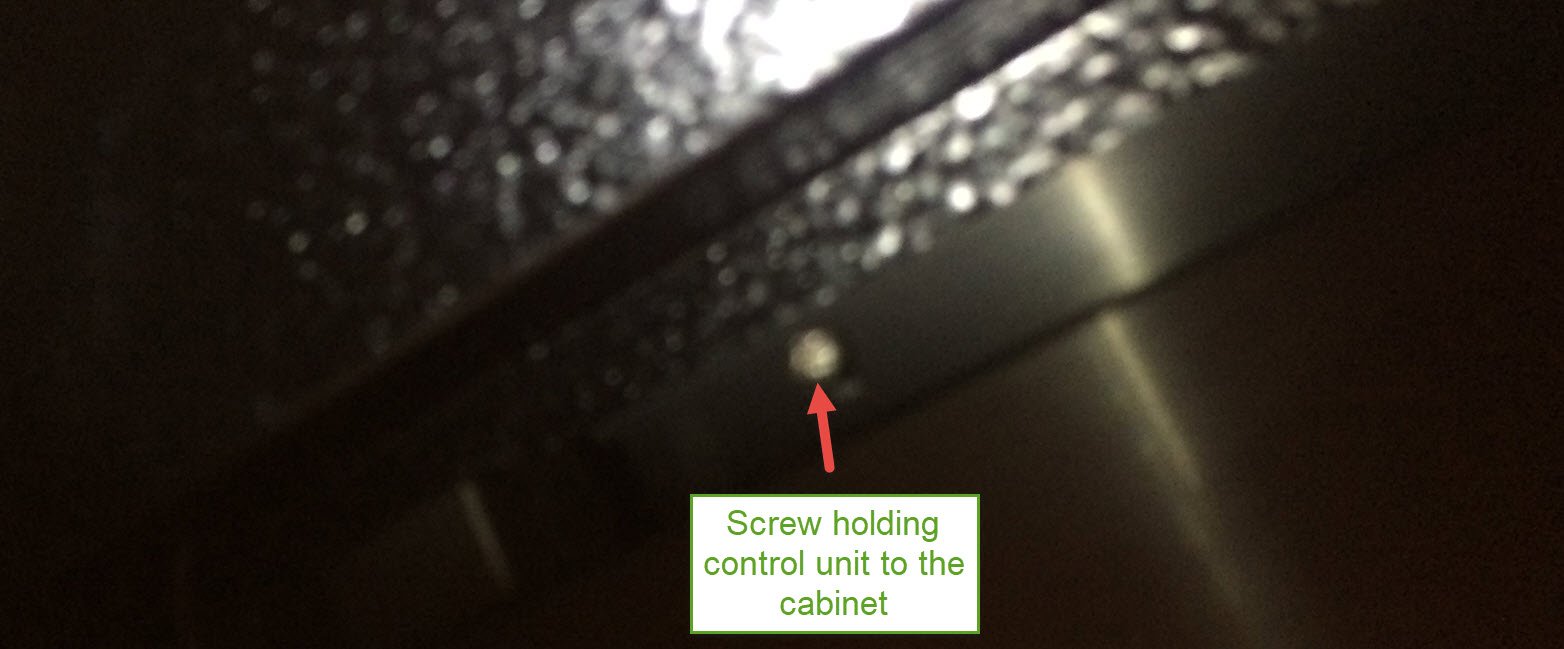
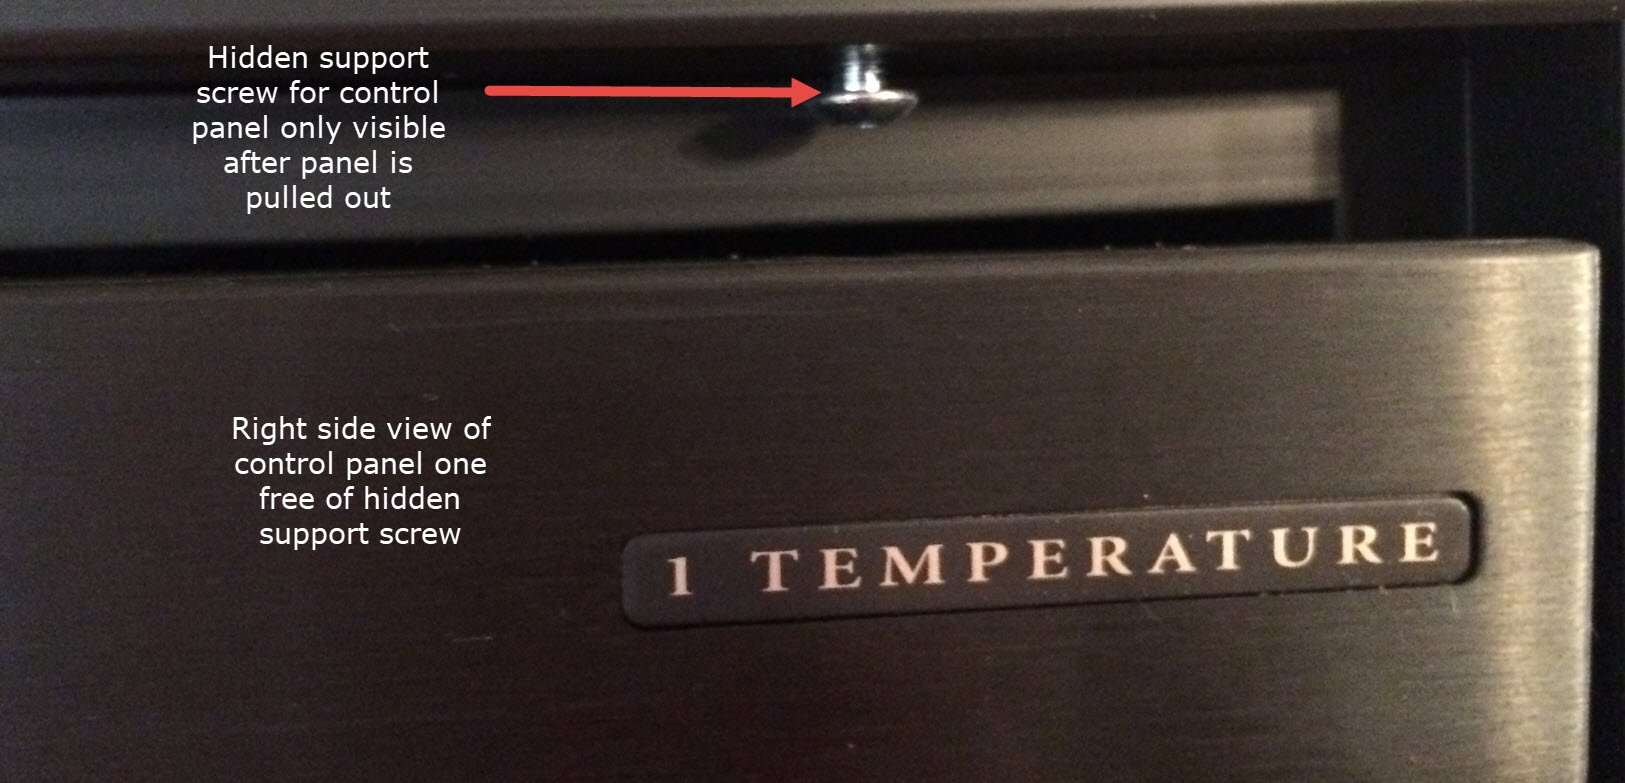
The control unit is held in place with two hidden screws that secure it to the cabinet. Work them out by grasping the control unit at each end and pulling towards you. The control unit will only be supported by wires after this point, so pull gently and support it on highest shelf. (Pics 3 & 4).
STEP 3
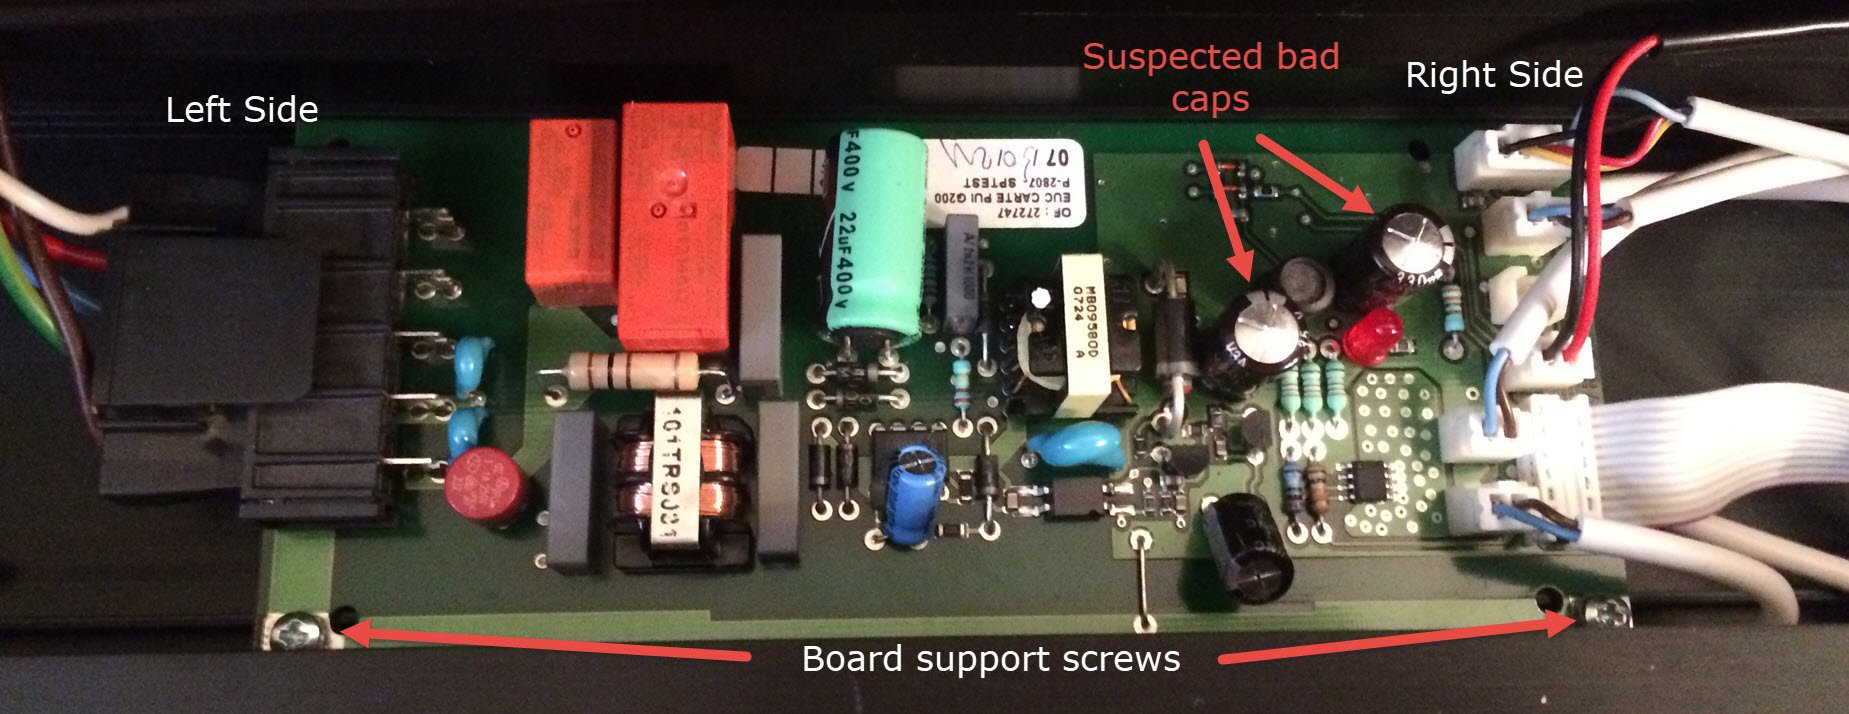
At this point you can look down into what I believe is the control board. (Pic 1) I believe the other one is the power board, but don’t hold me to that. I’ve seen other posts saying the boards may be combined/joined in other/later models.
I labeled the suspected bad capacitors. They are both the same. 35 Volts and 330 micro farads. The gray stripe is indicating where the negative lead is. You can tell that both of the tops are bulging out which is an indication of failure. You can order replacements from Amazon or any electrical supply store. Order the same voltage and same (or higher) mirco farads.
The other caps look fine so I don’t plan to mess with them.
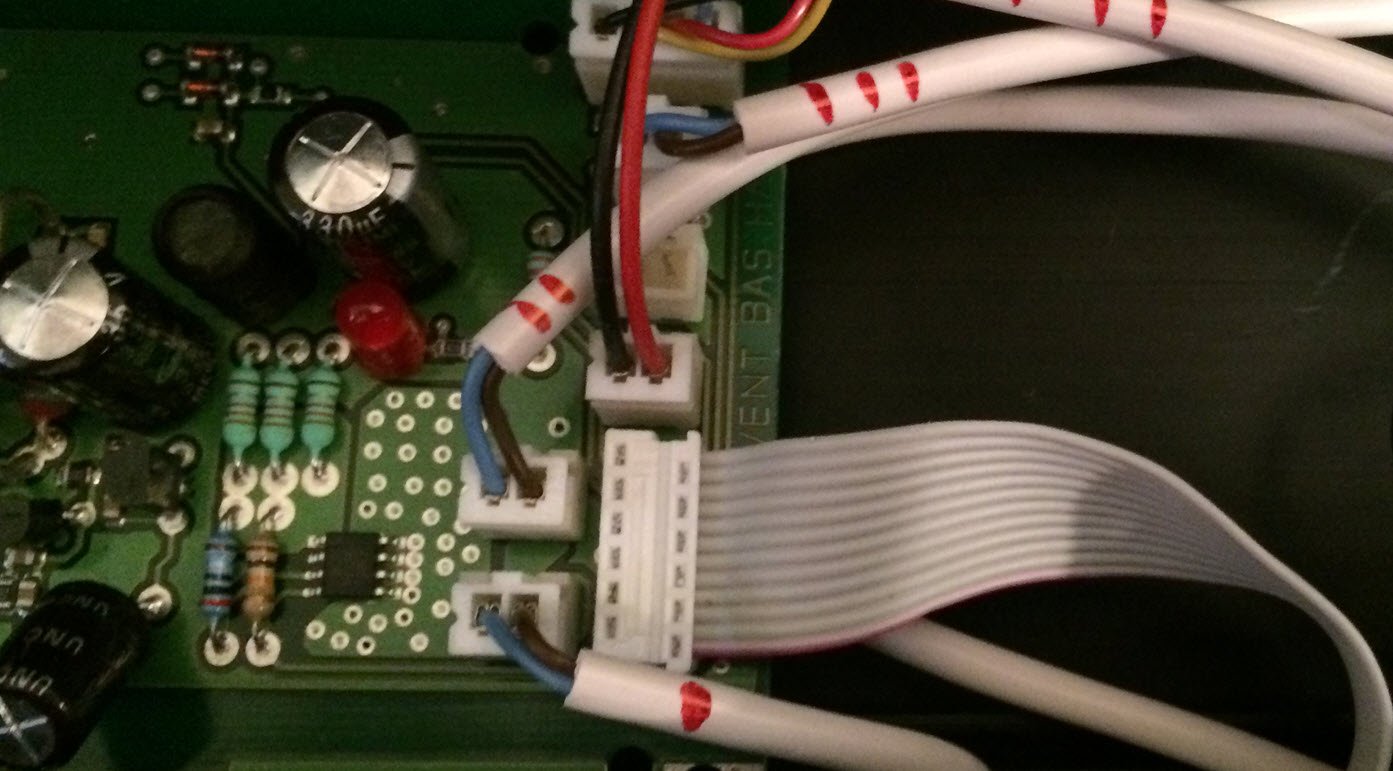
Before removing the board, I labeled all of the white wires with a Sharpie with 1 thru 4 lines from bottom to top for reconnecting later. (Pic 2) Or you can label accordingly so you know where to put them back. You can then remove the support screws and pop out the board from the metal support piece. These screws have lock washers underneath, so don’t lose them.
You can now remove the board to remove the connectors. The large black connector on the left has a lip you need to lift slightly before you can pull it off.
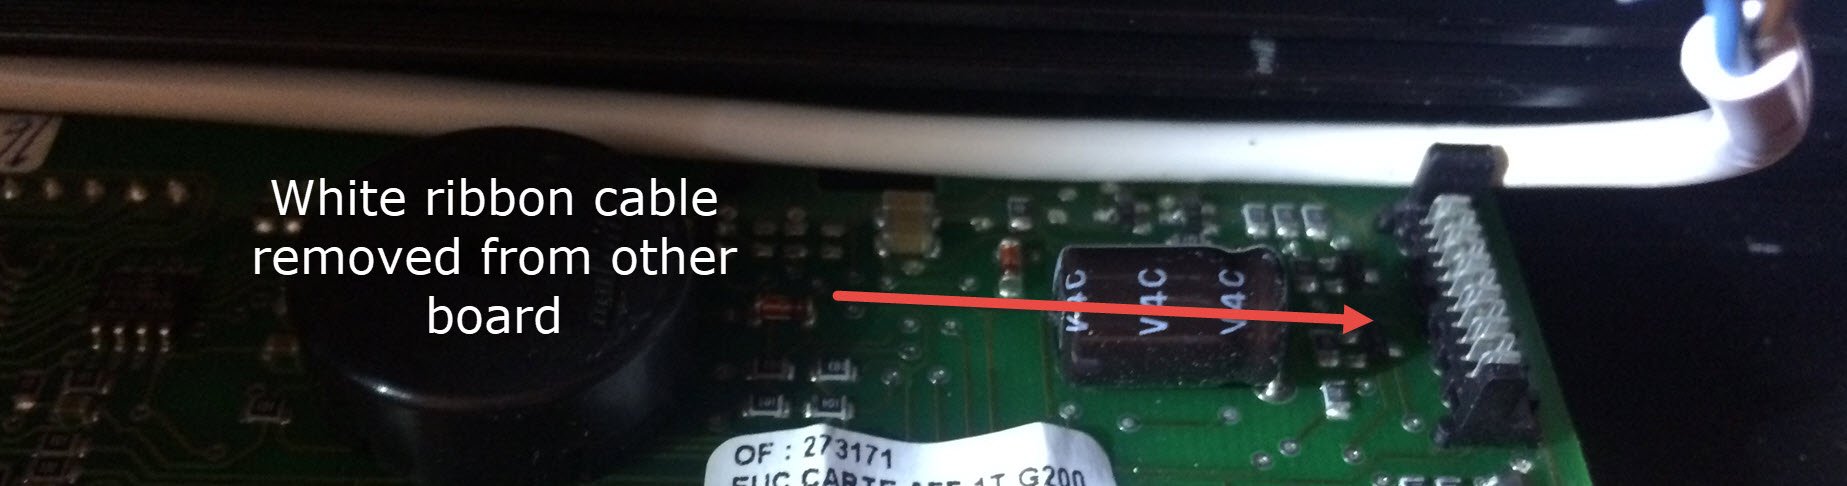
The white ribbon cable on the lower right I found to be very difficult to remove. I didn’t want to force it, so I just ended up removing the other end from the other board since it has better access to remove it. (Pic 3)
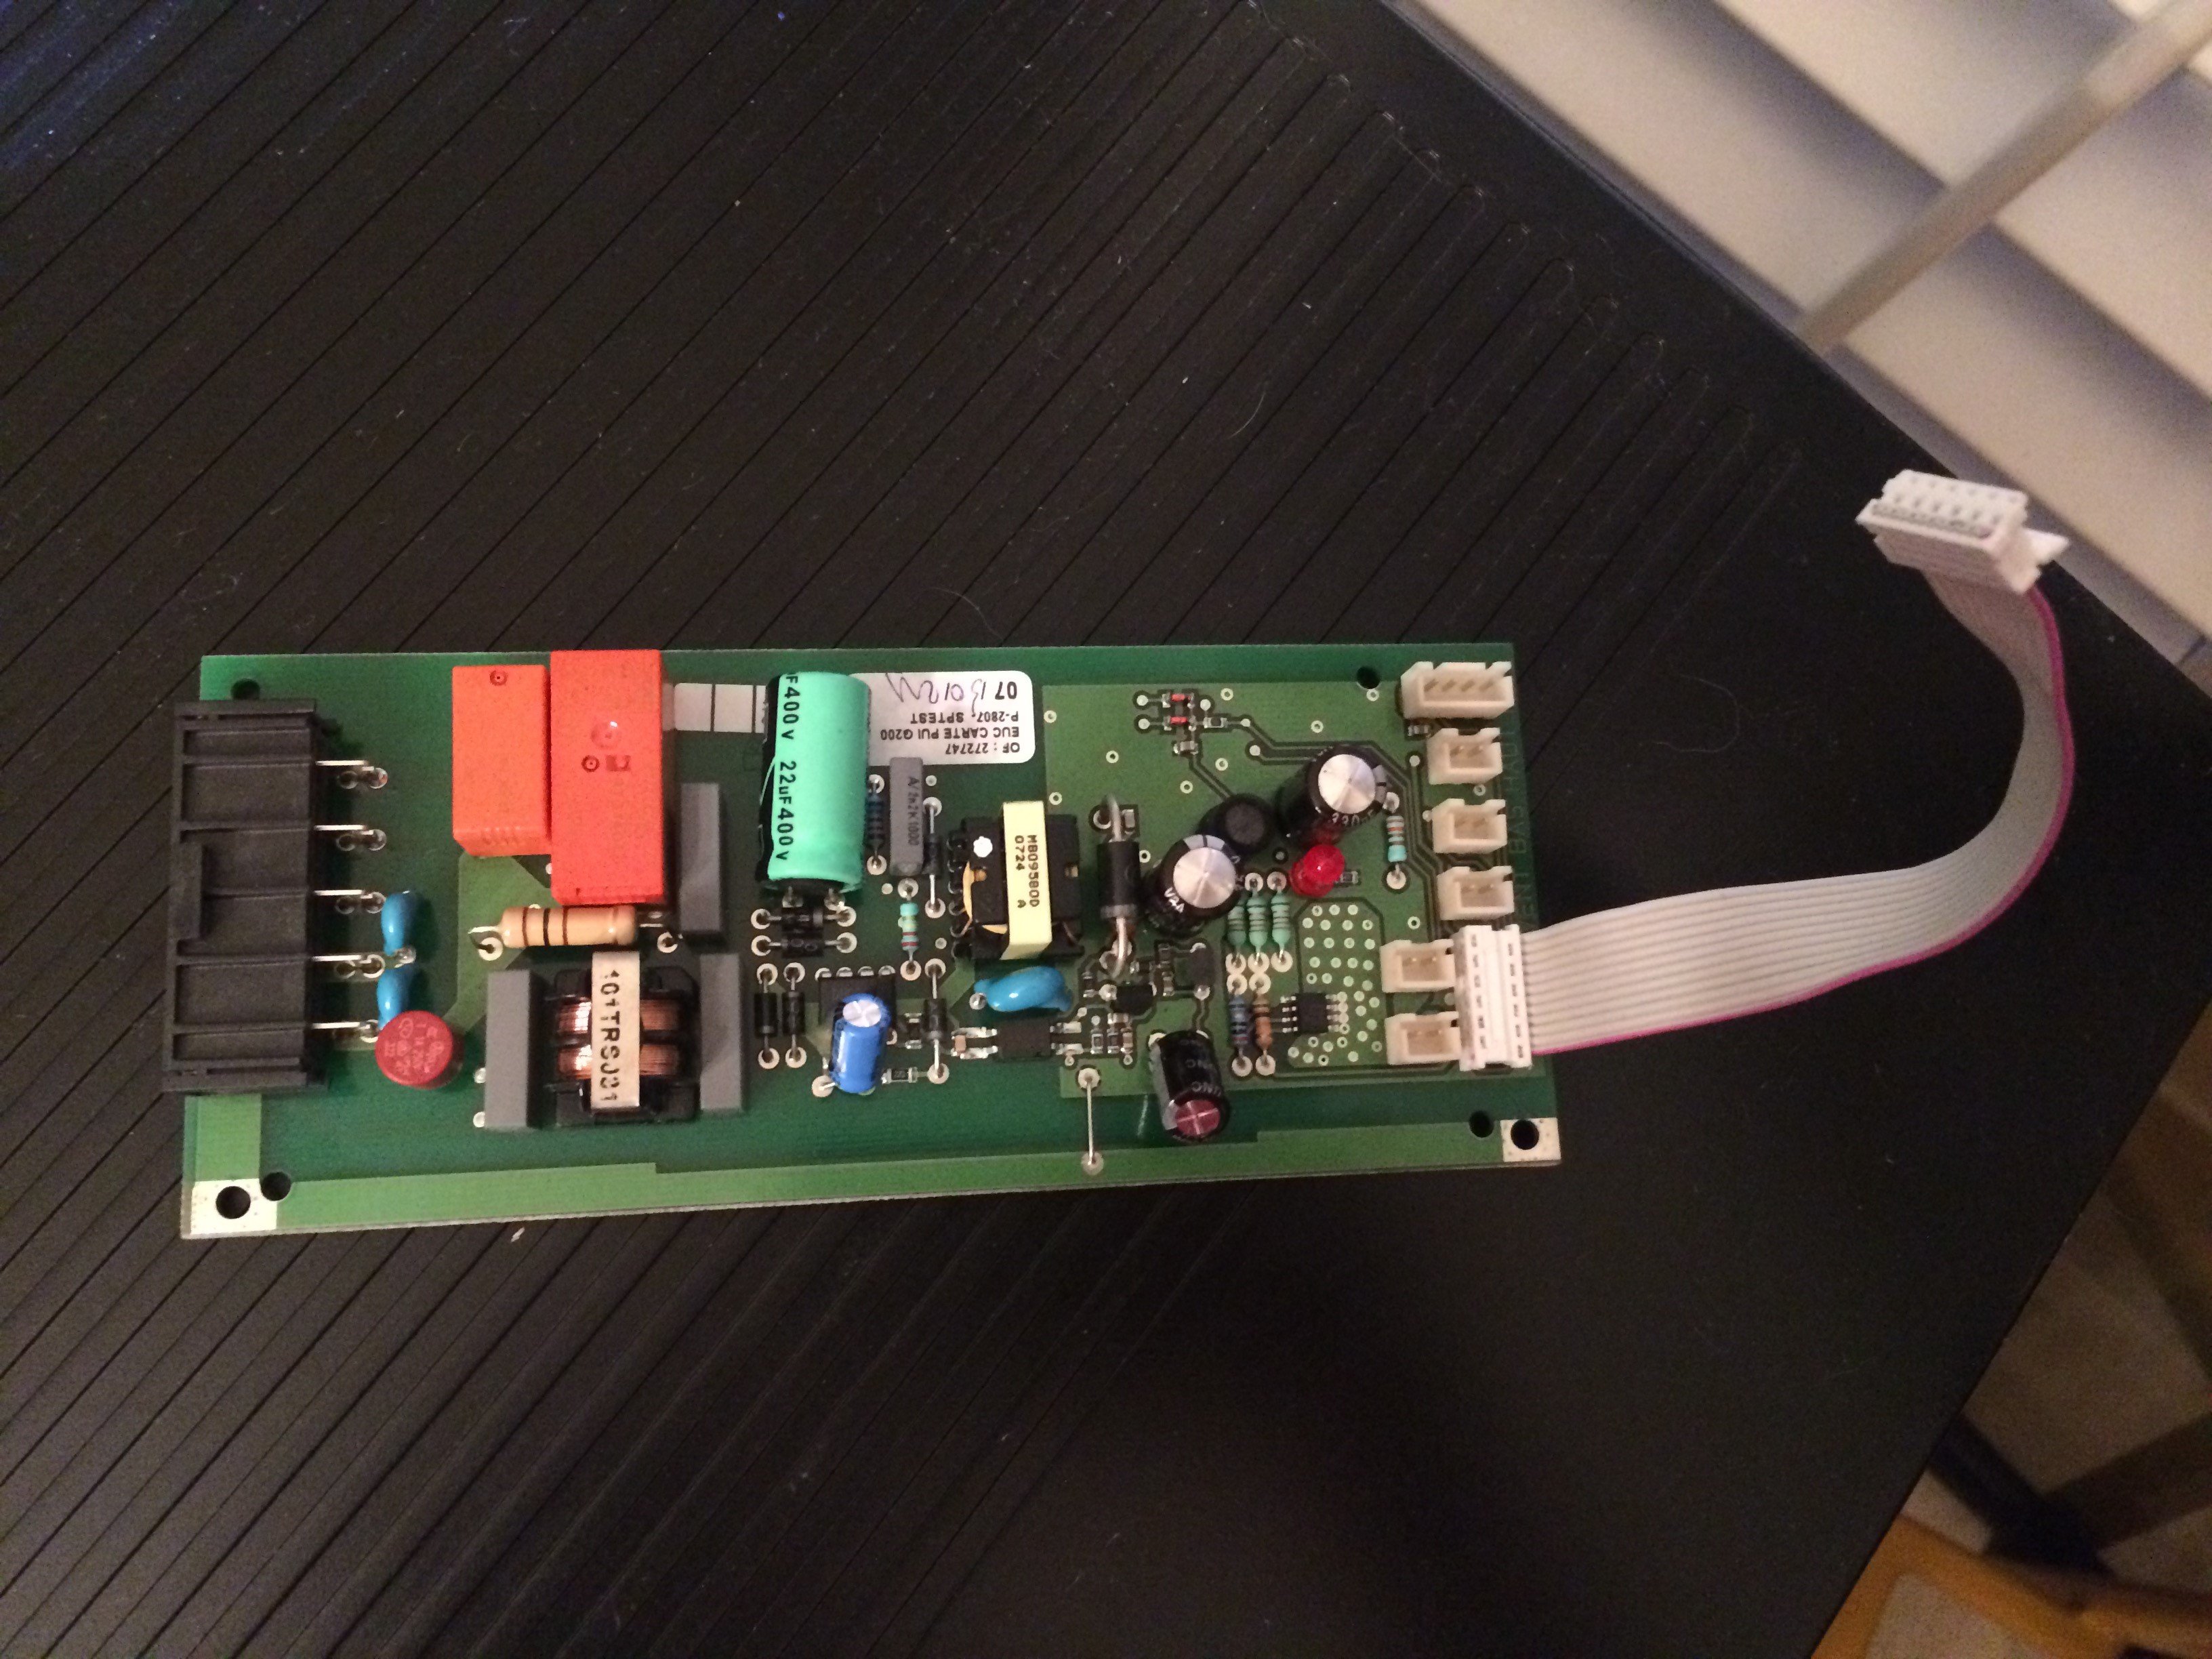
Free board in last pic.
At this point, I’ll pause until next week. My replacement caps are coming today and I will have them soldered into place and re-assemble. I’ll report back on hopefully successful results and give some closing thoughts.
Cool post Bill. I replaced that blue one as well but recall soldering at that location was challenging. I didn’t have a volt meter at the time but could also use that to assess the caps. Agree those black ones look swollen—hopefully that’ll fix the issue. 10yrs and counting for me, no issues!
Sharing my experience.
My unit always flashed U1.E 203 when it’s initially powered on (e.g. when the power goes out). This happened for under a minute (can’t recall how long), but then started cooling.
Recently, it started continually flashing U1.E 203 and wouldn’t cool. I took the control board out and the black capacitor (at least one of them) was blown.
I replaced the two black 330uF 35V capacitors on my board (just as above). The unit flashed U1.E 203 for 10 seconds upon plugging in, but then goes on to cool normally.
Everything seems to be functioning properly, but I’m not sure what the initial flashing of U1.E 203 is or if that’s normal.
Has anyone else seen the U1.E 203 flash when initially starting up/plugging in?
Did you see U1E / 203 when you first plugged in, then it went away and came back after 2 hours? Or does it function properly without any codes flashing and then the code pops up after 2 hours?
Re-installed my board with the replaced caps last night. The same U1.E / 203 error came up VERY briefly then went away (hopefully for good) as the unit initialized. Went thru the menus to set it up and it hasn’t returned. My guess is that message shows up as the unit initializes after a power loss.
When I first got the error before I fixed the board, the unit was cooling normally still. I only had it a day (bought it used) and I found this fix post and shut it down to repair. So I don’t have a long history for you.
Seems like the error starts out as intermittent as the caps start to fail. My guess is it will come and go (while continuing to cool normally) for a while. One the cap(s) fail for good, then I bet the error will not clear and the unit will not cool.
Going to post my end results here in a bit and repost as a new thread for others to follow.
Best of luck!
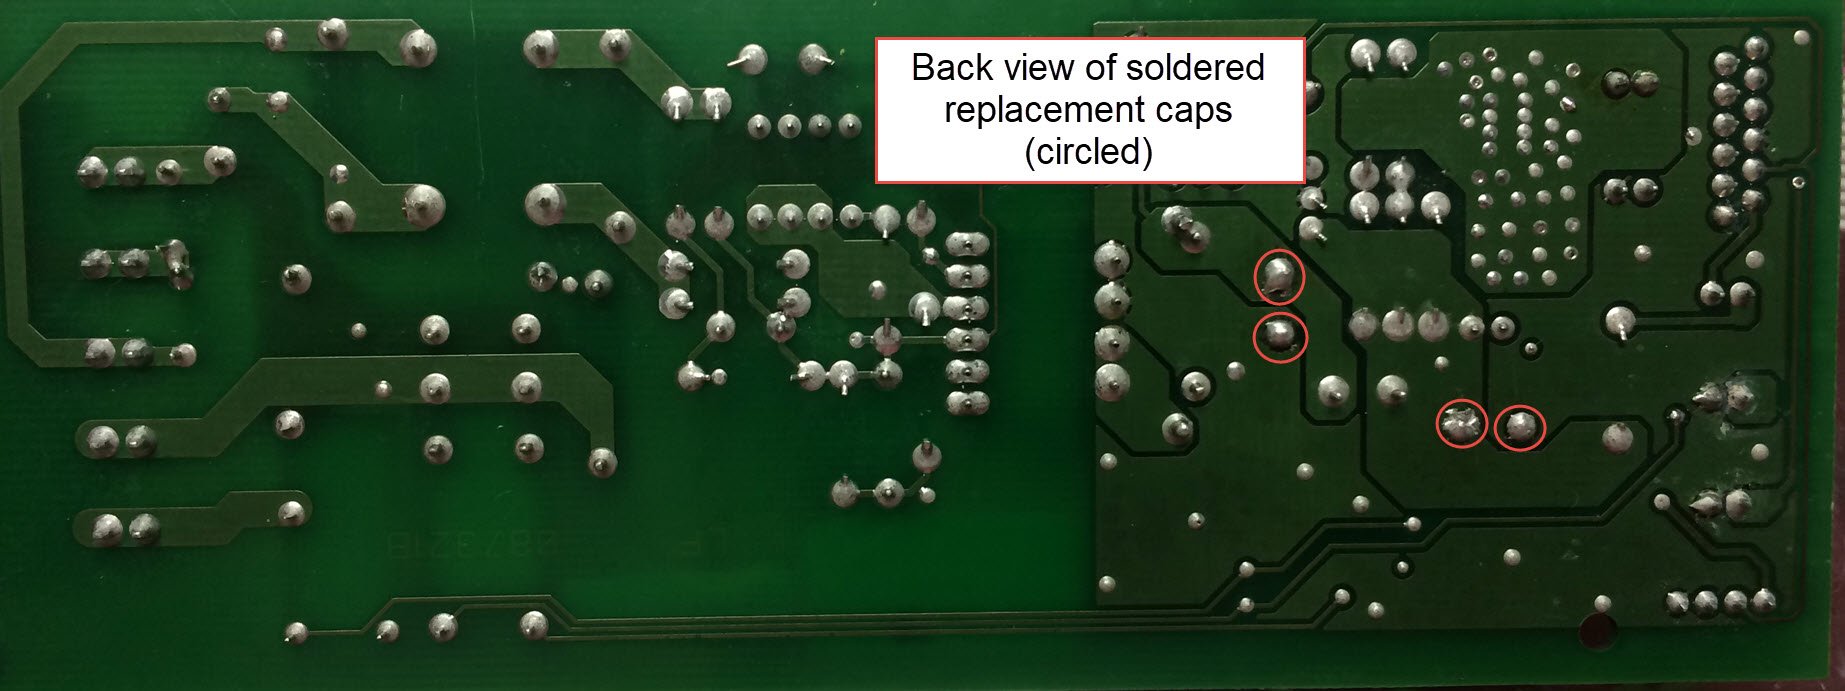
STEP 4
So got the board soldered and reinstalled. The attached pic shows the back side of the board with the re-soldered caps circled in red. Note polarity must be maintained. The negative leads on the caps are marked with a stripe on the jacket. If looking at the front of board, the stripe needs to be facing to the right on the upper right cap, and towards the top on the middle cap.
Put the board back into the metal control panel piece as you removed it. The back side goes into the support groove, then rest on the rails where the screws go.
You need to make sure the large black connector on the left side of the board will reach before you tighten down the board screws/washers. You have little play in that black connector length while each of the white wires have a lot more length to play with while plugging into the right side of the board. Plug things in as you found them and slide the black metal piece back over the hidden support screws at the top of the unit.
The fan support plate was tricky to get lined up. I ended up putting that lip under the control piece then screwing it back in. I honestly don’t remember, but when it came out I didn’t notice that fan support piece sagging until the control unit came out. So that’s how I put it back in.
Plugged in the unit and the same U1.E / 203 error came up VERY briefly then went away (hopefully for good!) as the unit initialized. Went through the menus to set it up and it hasn’t returned. My guess is that message shows up as the unit initializes after a power loss as some others have noted.
When I first got the error before I fixed the board, the unit was still cooling normally. I only had it a day (bought it used for $500) and I found this fix post and shut it down to repair. So I don’t have a long history for you.
Seems like the error starts out as intermittent as the caps start to fail. My guess is it will come and go (while continuing to cool normally) for a while. One the cap(s) fail for good, then I bet the error will not clear and the unit will not cool.
I am fortunate to work with some talented technicians, so one of them soldered the new caps to the board for me. I would not have tired the soldering myself. Suggest you find a good repair guy/shop who can do the soldering for you.
Other options I found in my research was on eBAY. This may be one of the “send away” board repair shops some others mentioned. Seems like they will source the $1.50(US) caps or similar low value parts for you and solder them in for you and test For $119. If it’s a more expensive part or they can’t get it, you will be out of luck. No endorsement of any kind, but here a link for one such place I found.
Seems like WE will be happy to sell you a replacement board for $650-$750 as well.
I also got a reply from the Canadian Rep from EuroCel Canada (service@eurocelcanada.com) . They were offering $399CDN for just the power board.
But I have confirmed this cap replacement WORKS. Thanks again to Josh and Phil for steering me in the right direction.
Hope you find the guide useful and that you get similar results for $3 or less vs spending hundreds on the repair! (I’ll accept your savings in donated wine!)
Good luck!
Board in and no faults! Only one day in, but hoping for YEARS like you are getting!
Cheers 
Great post! Thank you to J.Durham for starting the post 10 years ago and Bill L for the helpful step-by-step with pictures. I successfully completed the fix and am hoping it works as long and longer than J.Durham’s fix!
A little data I wanted to provide: after removing the caps I measured them and I also measured the new caps. The faulty (and bulgy) caps measured 148 uF and 215 uF, while the new caps ranged from 324 uF to 330 uF (measured qty 6). So now we have empirical to add to the case the fix was correct.
Thanks again! Cheers!
Hello all.
I found this thread after buying a secondhand Eurocave Compact v059 from eBay. Got it home and and when powered up it errored with U1.E / 201 on the display. Thought I was doomed and my eBay bargain would be a very expensive mistake.
However following the instructions on here I have fixed it by replacing one capacitor. So thank you very much everyone who posted on here, in particular Bill L for the very useful photos which gave me the confidence to get my screwdriver out.
Glad it worked for the compact model as well!
I have a relatively new unit (manufactured 2018) that I bought second-hand. The compressor comes on but the unit does not cool (the coils in the back do not get warm). I am assuming this is a coolant leak, and am going to use Chris’s method (Eurocave failure - WINE TALK - WineBerserkers).
Any other thoughts?