Artisan bakery Honoré in Seattle makes good ones. They’re a little closer to you.
Caneles turned out delicious even though I did not get the perfect color.
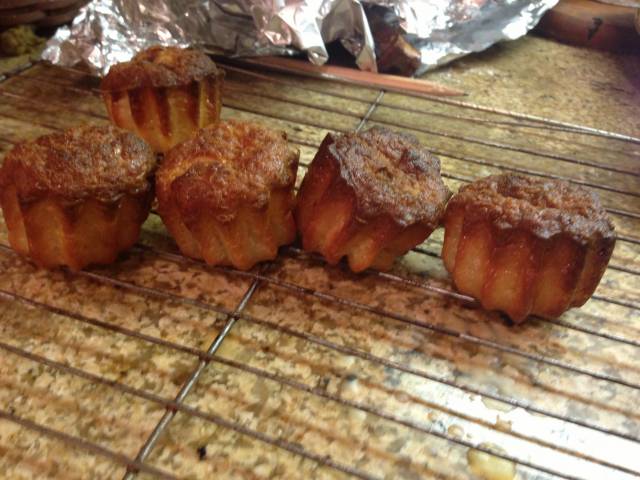
Color looks exquisite to me.
made mine yesterday. Did both silicone molds and copper/tin. Did some w beeswax as per the classic recipe. Made 15 in the silicone and 6 copper/tin. We had 2 left this morning–so good. Ordered more copper/tin molds today. I don’t know how to post pictures–tech impaired.
alan
http://chezpim.com/bake/canele-recipe-method
great story here. Suzanne posted the link–it is great and I used some of the techniques.
alan
How did the silicone compare with the copper?
I preferred copper. better crust and carmelization but I used beeswax on those, too, so too many variables. I am caneled out now, however, due to overeating of the Doric column goodies.
alan
Ryan, I used the silicon molds. I think they cooked great. I had a great contrast of the custardy middle with a firmer and chewy outside. I think that the copper would have given a little more Carmel color on the outside. Also it was a little annoying coating the silicon with the butter and beeswax mixture. I initially tried brushing on the beeswax-butter mixture but I was not getting great results on the sides. So I cleaned then out and started over by filling the molds with wax and then pouring it out like suggested for the copper. But since the silicon molds are a six pack instead of singles it got a bit messy and you end up wasting lots of the mixture because it solidifies on the top of the mold and you lose some pouring in and out. That said, for amount of times I will make the caneles and given the price difference I would have no issue recommending the silicon.
Wow, $30 a pop for one 2 inch canele copper mold? I thought the price of copper has fallen lately. This dessert would be right up my alley since I am a huge creme brûlée fan. Unfortunately, I have been on a bad streak lately with the restaurants not making them right. ![]()
I can provide a creme brulee recipe if you like.
Send it please. ![]()
This is basically a custard and it takes a little advance planning. For every two servings you’ll need:
2 egg yolks - 3 if you’re being hedonistic
1 cup of heavy whipping cream
¼ cup of sugar
1 teaspoon vanilla extract or paste
First, you have to separate the eggs. Forget that crap about pouring the egg from half the shell to the other half. The shell always pierces the yolk. Break the thing into a little bowl and then pour it into your hand. Let the whites drain through your fingers. You’re done. Put the yolks into a medium-sized bowl big enough to handle the eggs and cream for the number of desserts you’re going to make.
Put the cream in a saucepan and bring to a simmer on the stove. It should have little bubbles around the edges and shimmy a bit. Watch it carefully because if it boils over you’ll have one hell of a mess.
While the cream is heating, beat the egg yolks and sugar together with a whisk until the mixture is pale yellow and forms a ribbon when you lift the whisk out of it. Add the vanilla and mix. Vanilla paste is cool because it has little flecks of vanilla bean seeds in it and it doesn’t have as much alcohol as regular vanilla extract - but it’s expensive and may also be hard to find.
Here comes the only tricky part. You have to get the hot cream incorporated into the egg mixture without scrambling the eggs. Make a rat’s tail out of a kitchen towel and wrap it into a circle the bowl can sit on so it won’t move (alternately, OXXO makes these cool non-skid bowls with pour spouts, which will make your job easier later).
Grab your whisk and start whisking the eggs. Pour in a small amount of the cream and keep whisking. Add a little more cream and keep whisking. A little more. What you’re doing is gradually raising the temperature of the mixture, a process called ‘tempering’ the eggs so they won’t go into shock from a massive dose of heat and coagulate. When you’ve gotten about a third of the cream in the bowl you can pour it more rapidly, but keep whisking.
In the meantime, pretend you’re on the prairie in 1870 and there’s a woman about to give birth. Boil some water, preferably in a teakettle for easy pouring.
Pour the custard into a pitcher if you have one - anything with a pouring spout will do including your bowl if it’s one of those OXXOs - then pour it into 6-8 ounce ramekins. Many people suggest pouring it through a sieve to make there are no lumps. I’ve never bothered or had a problem because I whisk the stuff pretty hard and am careful about adding the cream, but knock yourself out if you feel like it. Put the ramekins in a baking pan or dish with fairly high sides and fill the pan with the boiling water until it comes halfway up the sides of the ramekins. This is to keep the custard from curdling.
Bake at 325 degrees for about an hour, or until the mixture has shrunk somewhat from evaporation and you can grab the ramekin and jiggle it without the custard moving too much. Let them come to room temperature in the hot water, and then refrigerate overnight. Cover them with plastic wrap if you have anything smelly in there - like a plate of salami that’s not wrapped or a decomposing fish.
At serving time, sprinkle about a tablespoon of sugar on top of each custard and caramelize it. It should look almost burned, since crème brulee means ‘burnt cream’. There are two ways to do this.
The first method involves a trip to Home Depot or Lowe’s. Buy a Bernzomatic propane torch. Some come with igniters but the ones that don’t have igniters light almost as easily with a cigarette lighter. Just turn on the gas and strike the lighter in the stream of propane - pointed away from people and flammable things, of course. There are special crème brulee torches sold at kitchen stores but they’re not hot enough and essentially no better than the broiler. They’re expensive, too.
Aim the flame at the sugar, moving it constantly, until the sugar is melted and beginning to almost blacken in spots. Let the sugar cool and harden (tap it with a spoon to check) for about five minutes and serve.
$17.80 each at JB Prince Co.
alan
Alan, I’ll feed you all the canellé you can eat if/when you visit Manila.
Best,
N
be careful-- several of us may show up!
alan
That’s ok, my friend Cyrille Soenen’s restaurant can churn a lot out.
I was reading on another board that if you cut the silicon molds up so that you have individual molds instead of one tray and then space them further apart on the baking sheet you get a much better crust and caramelization. I have not tried it yet but it certainly makes sense and reduces the cost significantly.
Is all Beeswax the same? I’m going to try the silicone molds first!!
Pauly, just use this stuff.

Damn, these are expensive already made too.